
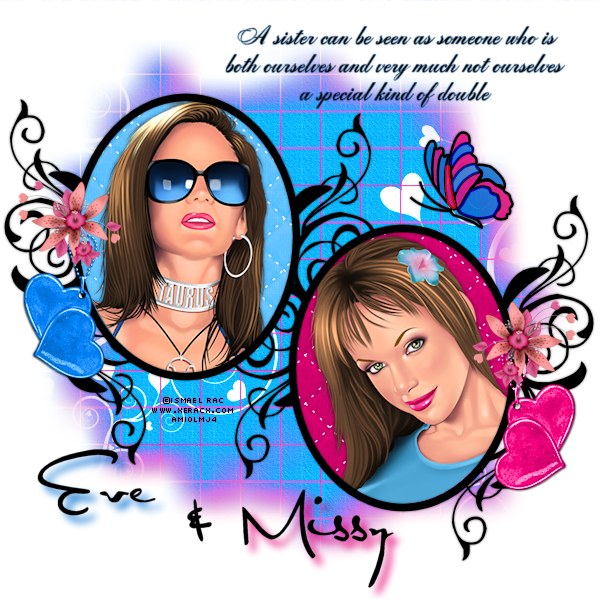
(Click on the sig to view full size)
Sisters
This tutorial was written by Eve using my own imagination. You may use my tutorials for group
challenges. Please link back to this site or my blog.
*Dedication and Inspiration*
This tutorial is dedicated to my little sister Missy.
You are the greatest gift that god above has given me. I am very proud of you and the woman you turned
out to be. May he continue using you to help and lead misguided, hurting, disfuntional, mentally ill teens giving
you the wisdom, patience and witt you need.
Not only are you my sister but my bestest friend as well. You will always be my little sister no matter how
old and wrinkly you get.
Supplies Needed:
A Cute Kit by Kimmie of Kimmies Creations called "Best Friends Forever" which you can purchase Here
Template #4 by me which you can findHere
Mask of choice
Font of choice
Eye Candy 3000 for the Drop Shadow
2 Tubes of choice by the artists Ismael Rac which you can purchase over at AMI
in the Package Area
Ready? Lets Begin by opening up the Template - Going to Windows - Duplicate -
Closing off the Original - Resizing it if you want to and Removing the first Layer with the
Credits on it
1- Open Paper 17 - Copy and Paste it over - Move this Layer down and place
right above the White Background Layer - Apply your Mask - On your Layers Palette - Change the Blend Mode
to Hard Light - Go to Effects - Eye Candy - Plugins - Drop Shadow - and change the Settings to
Distance 10 - Blur 10 - Opacity 90 - Color Code # F0027A
2- Open Papers 2 & 4 - Click on one of the Frames - Go to Selections - Select All - Selections - Float
Selections - Defloat - Copy and Paste Paper #2 - Selections - Invert - Delete - Selections - Select None - Go to Adjust - Hue and Saturation
and change the Settings to - H147 - S252 - On your Layers Palette - Change the Blend Mode to Hard Light
3- Click on the other Frame - Apply the same Action as in Steps as in #2 - This time using Paper #4 and leaving out the Adjustments
4- Click on any of the Frames Background - Go to Selections - Select All - Selections - Float - Selections - Defloat
5- Open your Tube - Resize it a little - Copy and Paste it over - Selections - Invert - Delete - Selections - Select None -
Add a nice Drop Shadow to it
6- Click on the next Frame - Apply the same Action as in Step #5
7- Open Double Heart Key Chain 2 - Resize it - Copy and Paste it over - Go to Adjust - Hue and Saturation -
Colorize - Change the Settings to H 154 - S 252 - Duplicate this Layer - Image - Mirror - Go to Adjust -
Hue and Saturation - Colorize - Change the settings to H 233 - S 252 - Add a Drop Shadow to both Heart Key Chains
8- Open Fancy Flower - Resize it - Copy and Paste it over - Add a Soft Drop Shadow - Duplicate this Layer - and Arrange
See mine
9- Click on the Frames - Add a Drop Shadow to both - Do the same with the Doodles
10- You can leave the Butterfly as is or if you want to Colorize it do the following Steps
To Colorize The Butterfly
1- With your Magic Wand - Click on the inside of the Butterfly - Anywhere you wanna start is fine - Open a New Layer
so that if you don't like the Color you can just Delete it instead of having to Undo - Choosing
a Color from your Tube or Kit - Colorize that Spot with your Paint Brush
2- With your Magic Wand - Click on another Section of the Butterfly - Open a New Layer again - Choosing another
Color from your Tube or Kit - Colorize that Spot with your Paint Brush
4- Continue the same Actions as in Step 1 and 2 until you have Colorized your Butterfly
5- Click on the Original Butterfly Layer and Move it to the Top - Add a Soft Drop Shadow to it
11- Choosing a Font of choice - Type out the Poem or any saying of choice - If you wanna give it a little background glow
go to Effects - Plugins - Eye Candy - Drop Shadow - Change the Settings to Direction 315 - Distance 0 - Blur 3 -
Opacity 100 - Color Code I used #016fd2 or a Color Code of Choice from your kit and tube - See mine
12- Click on the White Background Layer and Add your Mask again so that the Colors remain if you are planning on saving
it as PNG cuz the Colors will change from using the Blend Mode Method on your creation - Merge Visible
13- Add your Name
14- Add the © or Artist Credits
and Phew! Your Done! Hope you enjoyed this Tutorial. Any questions or comments pop on over the shout box.
If you would like to show me your results and have them added to my blog gallery you can either post them
here or send them to me at SweetTartDesigns@rocketmail.com
Until Next Time!
(Another Version)
(Click the sig to view full size)

No comments:
Post a Comment
Thank You So Much For Your Comments